

| MINIGUN TUTORIAL ROUGH DRAFT: |
|
Materials bought at ACE HARDWARE store
| Qty | Item | Price per item |
| 6 | 5/8 inch dowels (36 inches long) | $.73 |
| 2 | 1/2 square dowels (36 inches long) (You may only use 1) | $1.13 |
| 1 | 11.5 inch section of pvc pipe 1.5 inch outer diameter | < $1.00 |
| 6 | 12 inch sections of pvc pipe 1 inch in outer diameter (will be cut to 10.5 inch long later) | about $1.00 |
| 2 | 8 inch sections of PVC pipe 3.5 inch outer diameter | about $2.50 |
| 2 | 1.5 inch coupling sxs | $.37 |
| 4 | 1.5 inch c/o plug only | $.36 |
| 1 | pvc-dwv hub adaptor | $5.59 |
| 1 | 3 inch repair coupling | $2.64 |
| 1 | 3 inch lazy susan | $2.59 |
| 1 | Krylon semi flat black spray paint | $2.99 |
| 1 | Bondo putty | $??? |
| 1 | 5 minute Epoxy | $3.00 |
| Total: | $37.63 |
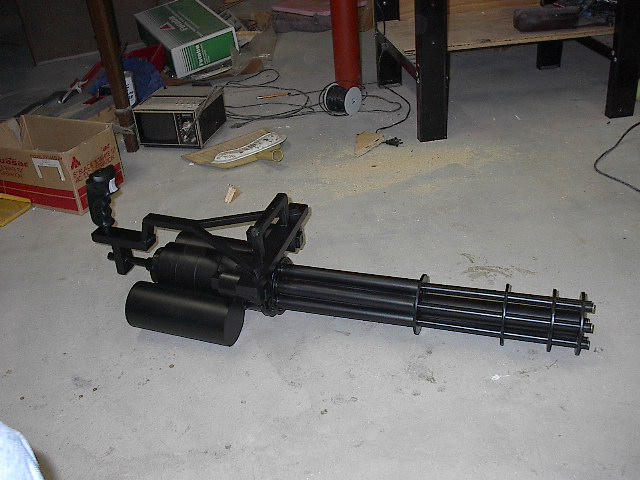
Making the barrel
I made my barrel 22 inches long. Make you're as long or as short as you like,
just remember the longer you make the barrel the more
stress is put on the area where the barrel and body join.
Let's start with making the necessary circles that'll hold the 6 barrels in place.
Create a template
On a piece of paper draw a circle with a 4.25 diameter using a compass. Mark the center.
Draw 2 lines through the center so you have 4 equal quarters
You next need to draw a line at 30 degrees and one at 150 degrees.
 |
Now draw where the holes will go: The center of each of the 6 barrels will be centered 11/16th inches away from the edge of the circle. With the centers of the barrels found, draw a 5/8 diameter circle around each of the centers. |
 |
The inner circle will have a 1.5 inch diameter. and will be in the center of the template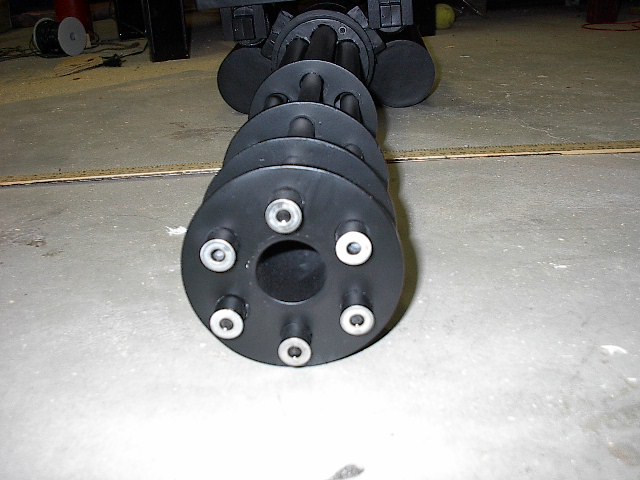
 |
 |
Do a dry fit of all the barrel pieces now. It should be pretty self explanatory where all the pieces go for the barrel. I have the tips of my dowels stick out 1/2 an inch from the first circle. It'll look something like this: |
because you're using dowels instead of tube the barrels just dont look right. To give it the illusion that they are made of metal and that they are hollow I have just epoxied on some washers that an outer diameter of 5/8 inches, Sand them to make them shine a little more and the affect turned out very well.
I still have to fix some things (the handle at this moment, well... it sucks)
First glue the pvc-dwv hub adaptor to the 3 inch repair coupling. I used some kind of plumbing epoxy I found laying around the house.
Use anything you'd like, but glue it on the inside if the 2 parts and NOT the outside. You want the outside as smooth and clean as possible.
Next, you'll need the two(2) 1.5 inch coupling sxs and the four(4) 1.5 inch c/o plug only pieces. Take the 4 plugs and saw off the threads so all you have are the tops. Glues the 4 plug tops to the sides of the 1.5 inch couplings so you end up with 2 closed off capsules.
| Take the 2 capsules and glue them to the top front of the body such that it looks like this pic. You may want to separate the "capsules" from the body with some blocks of wood that have had grooves sanded out of them. Try to have them evenly spaced and level since you will be laying a top piece over them. |  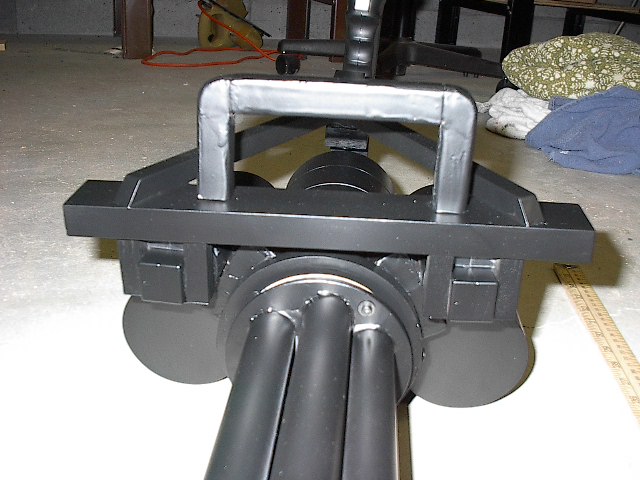 |
  |
The top piece is just a simple piece of wood that's 11 inches long, 1.5 inches wide and has a height of
0.75 inches.
After you have the capsules in place, go ahead and glue the top piece onto the caps. Once that top piece is in place we can start to use the square dowels. You have to create a "V" shape from the dowels (section A). A little geometry and you should be able to tell how long of pieces you need based on the angle of the "V" you want. My measurements for each side of the "V" were 8 inches long At the base of the "V" (section B) you'll want to glue to dowels together to get the thickness you want and so it matches the width of the base of the "V". The length of those 2 pieces I made 4 and 1/8 inches long. Section C is the same as B, 2 pieces glued together with a length of 2 inches. The hard part here is to join sections B and C at an angle that looks right for you. Experimenting is the best way to find the angle you want, sand a little bit off each time till you get what you want |
| Now that section C and section B are glues together, we now connect C to the trigger platform. The trigger platform is 5 x 1.5 x 0.75. The trigger platform also has another piece hanging from it. that piece is 2.75 x 1.5 x 0.75 and has a 5/8 inch hole bored through it for a section of dowel. The dowel goes back into the body of the gun. This gives the whole top part of the gun a solid connection to the base. you must have that dowel, else all the pressure goes to the front "top" and it'll snap under the weight. |  |

 |
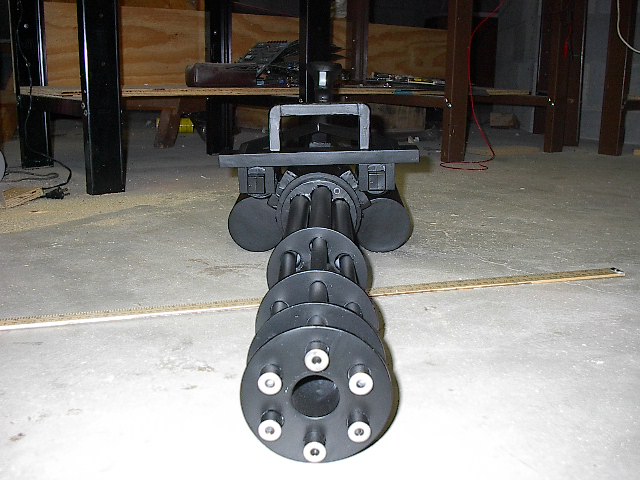
Now add the two(2) 8 inch side PVC sections to body like so. I used hot glue and epoxy. I'd suggest that you screw or bolt them together though. |
Plywood circles will also have to be made to cap off the 2 side 8 inch pvc pieces as well as the back of the body. Remember circle for the back of the body must have a 5/8 inch hole in it to allow the dowel in. Depending on how you measured all you top and back pieces the hole fro the dowel may NOT be in the center of the circle. It should be close, but is not guaranteed.
2 more things to do and your done, you need to find a joystick handle that you like and attach it to the trigger platform. Also you need to make a handle to hold on to. I simply cut out a "U" shapes piece out of 3/4 inch plywood, the dimensions I used were 5.5 x 2.5 x 0.75. Since alot of pressure will be put on this area do not just epoxy it to the top piece. In addition to epoxy I would suggest either nailing it in as well or to use screws