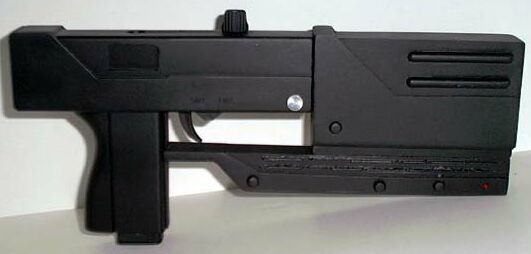
The Mac 11 Machine Gun from Blade


|
|
Online. Various prices. Check www.Spatcave.Com
for more sources on Mac11's |
|
|
Resin kit, $50. Contact "Spatcave" HERE |
|
Sheet styrene or plastic. 2 Small Pieces. |
Various prices depending upon materials used |
|
Machine screws (Optional) |
Local hardware store. About $1 |
|
Small red LED's (Optional) |
RadioShack. About $1 |
|
Small aluminum pins (Optional) |
Local Hardware store. About $2 |

|
|
Cleaned and washed the resin kit |
|
|
Removed the trigger guard and sanded the area flat |
|
|
Took the Mac11 apart and removed the front sight post. I also removed several of the mechanisms that make the gun fire. Mine will be a non-firing prop. |
|
|
Cut a square hole for the ejection port. The airsoft didn't have one, but I wanted mine to look as real as possible. |
|
|
Cut a small aquare of plastic sheet to cover ejection port hole. Used Superglue to hold it in place. |
|
|
What the outside of the port should look like. |
|
|
Re-assemble the gun |
|
|
Fill the screw holes with bondo. I also scraped some bondo across the lettering on the sides of the gun. I didn't want any manufacturers marking on the prop when I was done. |
|
|
Lined up the top and bottom parts of the kit and drilled a hole through the bottom part into the upper part. This is for the screws to attach the two parts together. Counter-sink the bottom holes so that the screws will be flush with the bottom of the gun. |
|
|
Filled the tiny amount of bubbles in the kit with Bondo |
|
|
Optional Step: Drilled into the center of the front facing screws. I plan on replacing these with real screws. You do not need to do this to complete your kit. |
|
|
Optional step: Counter-sink the four screws holes. |
|
|
Drilled out the barrel. I drilled down about 2" or so. Personal preference here. You can drill all the way through if you want. Like I said, this will be non-firing and by not drilling all the way I can be sure of that. |
|
|
I removed the rear sight with the dremel and sanded it flat. |
|
No Image for this step. Ooops. |
Sanded the bondo on the gun. |
|
|
Cut a small piece of plastic strip and superglued it under the trigger. This should go all way the to the bottom of the grip. |
|
|
Optional Step: Drill two small holes at the front of the lower half of the kit. These holes are for small red LED's. If you look at the reference pic above, you can see them. Mine will be non-functioning |
|
|
Tricky part. Cut the plastic barrel off the gun but DO NOT CUT THROUGH THE METAL INNER BARREL. This is what we will use to secure the gun to the kit. Once you can pull the metal inner barrel out from the gun, then remove any excess plastic barrel left over. Sand flat. |
|
|
I had a small piece of dowel rod that fit very snug into the barrel. I "eased" it into the barrel with a hammer. Let's put it this way. That will NEVER come out. This was to strengthen the barrel |
|
|
I used the sanding drum on the dremel to "shorten" the trigger. From test fitting the pieces, I noticed that the trigger would rub against the bottom half of the kit. |
|
|
Sanded the bondo on the main gun, and also drilled out the hole for the barrel of the gun. |
|
|
It looks ugly, but it's going to work. I wrapped electrical tape around the barrel where it sits inside the gun and where it meets the front end of the gun. This will keep it centered and keep it from moving around. |
|
|
Paint the kit with primer. |
|
|
Paint the gun with primer. |
|
|
Piant the kit with flat black |
|
|
Piant the gun with flat black |
|
|
Optional Step: Install the real screws. |
|
|
Put one end of the barrel into the kit. I drill it so that it was an extremely tight fit |
|
No image for this step. |
Test fit all pieces at this point. Make sure than when the front kit is attached to the gun, the bottom piece will fit snug against the grip. Once you are sure that all pieces fit, then proceed. |
|
|
Squeezed some glue from a glue gun into the gun opening and then pushed the upper kit onto the gun. Held in place for about 20 seconds. |
|
|
Optional Step: Glued the real LED's into the holes I drilled for them. |
|
|
Turned the gun over on its top. Placed the bottom half of the kit onto the top half and line up the holes. Screw the bottom half onto the top half. I used sheetrock screws because of the length and the taper of the heads. |
|
|
Filled all the gaps/screw holes in the magazine. I didn't want to see the spring that is used to feed the BB's into the gun. |
|
|
Sand the bondo on the magazine. I cut down the mag to look more like the one in the reference pics. There was s small notch in the mag for the mag release to catch on. I used a dremel and recreated that notch so that the shorter magazine will now click into place. I then painted it with primer. |
|
|
I filled the magazine with hotglue. This added weight and also made sure the shorter mag would stay in one piece |
|
|
Paint the magazine. |
|
|
I found these pins at my local hardware store. They look very similar to the retaining-style pins on the side of the main gun. they were a bit too long, so I cut them down to about 1/4" or so. |
|
|
Optional Step: Drilled holes into both sides of the main gun for the aluminum pins. |
|
|
Used the glue gun to fill in the holes with glue, then pressed the pins into the holes. |
|
No image for this step. |
Lock and load one magazine. |


